Description
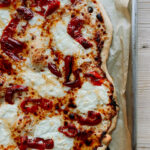
White Pizza with Hot Pickled Peppers and Honey perfectly balances creamy, spicy, and sweet for your Friday pizza night!
Ingredients
Scale
For the cheese sauce base:
- 1 tbsp garlic-infused olive oil (may sub for 1 tbsp extra-virgin olive oil + 2 minced garlic cloves)
- 1 tbsp unsalted butter
- 1 1/2 tbsp all-purpose flour
- 2/3 cup whole milk
- 2/3 cup parmesan cheese, grated
- 1/4 tsp Kosher salt
- 1/8 tsp cracked black pepper
- 1 pinch ground nutmeg
For the rest of the pizza:
- 1/2 recipe Easy Same Day Pizza Dough
- 1/2 cup parmesan cheese, shredded
- 1/2 cup whole milk ricotta cheese
- 1/3 cup pickled peppers in olive oil (I prefer these mildly spicy ones but you can also use this hotter version if you like more heat)
- 2 tbsp honey
- Optional: If you want an extra-cheesy pizza, you can add 1 cup (4oz) shredded mozzarella cheese along with the parm
Instructions
- Preheat your oven to 500 degrees F / 260 degrees C and set a bakers half sheet to the side.
For the cheese sauce base:
- In a small saucepan over medium-low heat melt the garlic-infused olive oil (or olive oil + minced garlic) with the butter.
- When the butter has fully melted, add the flour and whisk to combine fully.
- Once the mixture has started to simmer and become frothy, add the milk slowly, whisking to combine. The mixture will look chunky at first but will smooth as you whisk.
- Once the milk is combined, add the parmesan cheese and continue to whisk until combined fully.
- Season with salt, pepper, and nutmeg. The sauce should have thickened considerably at this point and be fairly smooth. If your sauce is too thick, add additional milk 1 tbsp at a time, whisking to combine. Remove from heat and reserve to the side until ready to assemble the pizza.
Assembling the pizza:
- Shape your dough. If you prefer a classic pie-shape with a thicker crust compared to the center of your dough, I suggest hand-stretching your dough. If you prefer your pizza to be an even thickness, I suggest rolling your dough out with a rolling pin.
- If you are hand-stretching your pizza dough:
- I like to rub a small amount of olive oil into my hands first; this allows me to shape the dough easier without it ripping accidentally from friction.
- Press the dough down with the palm of your hand into a disk shape, then use your fingertips to gently press down on the dough disk, further flattening it.
- To further extend the dough, I prefer to press one palm on top of one side of the dough and with the other hand lift the alternative side of the dough and gently work the dough outward, pulling very gently with the tips of my oiled fingers (like a very discrete “come hither” motion) to slowly stretch the dough out. Rotate slightly and repeat until the dough is shaped and stretched to your liking. If you find that the dough starts to snap back or is beginning to tear, allow the dough to relax for a minute or two before proceeding again. Transfer your stretched dough to a sheet of parchment paper.
- If you are using a rolling pin:
- I prefer to place my dough between two sheets of parchment paper to avoid the dough sticking to my rolling pin, but if you prefer you can also sprinkle a bit of flour over the dough ball as well as wiping some over your rolling pin by hand to prevent sticking instead. Once the dough has been rolled to your preferred size and shape, peel the top layer of parchment paper off (if using). The bottom layer that the dough is resting on can be utilized for your baking sheet. If you find that the dough starts to snap back or is beginning to tear, allow the dough to relax for a minute or two before proceeding again.
- If you are hand-stretching your pizza dough:
- Transfer your shaped dough to the reserved baking sheet.
- Top with reserved cheese sauce, using the back of a spoon spread the sauce out evenly over the dough.
- Top the pizza with parmesan cheese (the optional mozzarella can also be added at this time if desired), then top with generous spoonfuls of ricotta in evenly dispersed dollops.
- Finally, add the pickled peppers, dispersing them evenly on the top. I prefer to add mine directly next to the dollops of ricotta so you get a bite of spice at the same time as a bite of creamy cheese.
- Bake for 16-22 minutes or until the crust has reached your preferred level of crispness and the cheese is fully melted. I find that pizzas that have a thinner topping layer take less time to bake and heavier-topped pizzas generally take a bit longer to bake so watch your pizza closely after the 16-minute mark and adjust as desired.
- Once the pizza is baked, drizzle the top with honey, slice, and serve warm.
Notes
Nutritional information on Whip & Wander is provided as a courtesy and is approximate only. We cannot guarantee the accuracy of the nutritional information given for any recipe on this site.
Nutrition
- Serving Size: 1/4th of the pizza
- Calories: 615
- Sugar: 12 g
- Sodium: 589 mg
- Fat: 29 g
- Saturated Fat: 6 g
- Carbohydrates: 67 g
- Protein: 24 g
- Cholesterol: 27 mg