Description
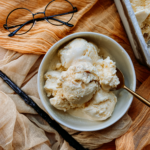
This Butterbeer Ice Cream is a perfect tribute to the Butterbeer I imagined when first reading the Harry Potter books. It includes a creamy brown butter speckled base with a whisper of almond extract, which makes the flavor feel a little nuttier, fragrant, and a little nostalgic. Ribbons of salty-sweet butterscotch weave through the ice cream base to achieve the optimal Butterbeer flavor.
Ingredients
For the ice cream base:
- 113 g (1 stick) unsalted butter
- 24 oz (3 cups) heavy cream
- 8 oz (1 cup) whole milk
- 200 g (1 cup) granulated sugar
- 7 large egg yolks, room temperature
- 1/4 tsp almond extract
- 1/4 tsp sea salt
For the butterscotch sauce:
- 57 g (4 tbsp) unsalted butter
- 100 g (1/2 cup) brown sugar
- 1 tsp sea salt (can add more if you like it extra salty)
- 4 oz (1/2 cup) heavy cream
- 1/2 tsp vanilla extract
- 1/2 tsp gold rum (optional)
Instructions
For the ice cream base:
- Brown the butter. Set a large pot or saucepan (the same one that you'll use for your custard) over medium heat. Add butter and allow to melt, stirring with a silicone spatula occasionally. As the butter melts it will begin to foam. Watch the pan closely during this process as the color will quickly change from buttery yellow, to golden, to toasty brown. Once the butter has reached a stage where it is golden brown, remove it from the stove immediately and carefully transfer the butter to a medium heatproof prep bowl. Reserve to the side.
- In the same pot over medium heat, add the heavy cream and whole milk. Allow the mixture to heat, stirring occasionally, until it just starts to simmer (you should see bubbles beginning to form around the outside ring of the mixture). Then remove from heat.
- While the heavy cream cooks, prepare your eggs. In a medium mixing bowl, whisk the egg yolks and sugar until smooth and pale yellow in color.
- Temper your eggs with your warm cream mixture by gradually adding very small amounts of cream to the eggs, while continuously whisking. I like to use a small ladle or a spouted heat-safe measuring cup to slowly stream the warm cream mixture into the eggs while whisking. It's important that you take this step slowly and continue to whisk as the heat from the cream mixture can scramble the eggs if added too quickly. Continue tempering until atleast ⅓ or more of the cream mixture has been combined with the egg mixture.
- Add the tempered egg mixture to the pot along with the remaining cream mixture and stir to combine. Return the pot to heat over low. Continue to cook, stirring frequently until the mixture reaches 170 degrees F (77 C) and coats the back of a spoon. To test this, dip a spoon into the mixture and then run your finger across the back of the spoon. If a clear path is made through the middle and the rest of the spoon remains coated, your mixture is ready to be removed from the heat.
- Pour the mixture through a fine mesh strainer into a large, heat-proof bowl. The strainer will catch any unwanted bits of egg that might not have tempered properly to ensure your ice cream is smooth.
- Combine the brown butter with the strained ice cream base. If your brown butter has cooled and hardened by this time you may need to reheat it briefly before adding to the ice cream base so that it does not solidify into clumps.
- Allow the mixture to cool for about 30 minutes then add the almond extract and salt, and whisk to combine well. If the mixture is cool to the touch at this point, cover and refrigerate overnight or until it has reached 40 degrees F (4 C) or below. If making ice cream the same day, this will likely take a minimum of 4-hours, but may take 6-hours or more, depending on the size and shape of your bowl and the temperature of your refrigerator.
- The next day (or later that same day) after the ice cream base has fully completed its fridge chill, churn your ice cream. Pour into an ice cream maker and process according to the manufacturer's directions. For my ice cream maker this requires a frozen bowl. Churning should take approximately 20-30 minutes, depending on your ice cream maker.
For the butterscotch sauce:
While the ice cream is churning, make the butterscotch sauce. The reason I like to make this at this stage and not far in advance is that the butterscotch will thicken and firm up as it cools. You'll want the butterscotch to still be warm enough to drizzle, but not so hot that it completely melts the ice cream upon contact. If you have to reheat to drizzle in the ice cream, the sauce will not be as emulsified and smooth.
- In a medium saucepan over medium heat, melt the butter.
- Add the brown sugar, salt, and heavy cream and whisk to combine.
- Bring the mixture to a low boil for 4-5 minutes, whisking occasionally, until smooth and thickened. Then remove from heat.
- Whisk in the vanilla and rum and taste for salt. Add additional salt if desired and whisk until combined. Reserve to the side to cool just slightly.
To assemble:
- Once the ice cream base is fully churned, transfer approximately 1/3 of it to a freezer-safe container (I like to use a loaf pan). Drizzle approximately 1/3 of the warm butterscotch over the top. Do not attempt to move the butterscotch too much once drizzled as it will firm up quickly upon hitting the frozen ice cream. Top with an additional 1/3 of the churned ice cream, and repeat with another 1/3 of the butterscotch sauce. Top with the remaining ice cream and butterscotch sauce.
- Cover the container and transfer to the freezer to firm up. This will take as few as 2-hours for softer ice cream and 4-hours for former ice cream. I find that this ice cream is best when consumed within 1 week.
Notes
Nutritional information on Whip & Wander is provided as a courtesy and is approximate only. We cannot guarantee the accuracy of the nutritional information given for any recipe on this site.
7/29/22 This recipe was updated and may no longer fit specified dietary preferences from previous versions of this post.
Nutrition
- Serving Size: 1/14 recipe (about 1/2 cup)
- Calories: 225
- Sugar: 22 g
- Sodium: 223 mg
- Fat: 15 g
- Saturated Fat: 9 g
- Carbohydrates: 22 g
- Protein: 2 g
- Cholesterol: 140 mg