


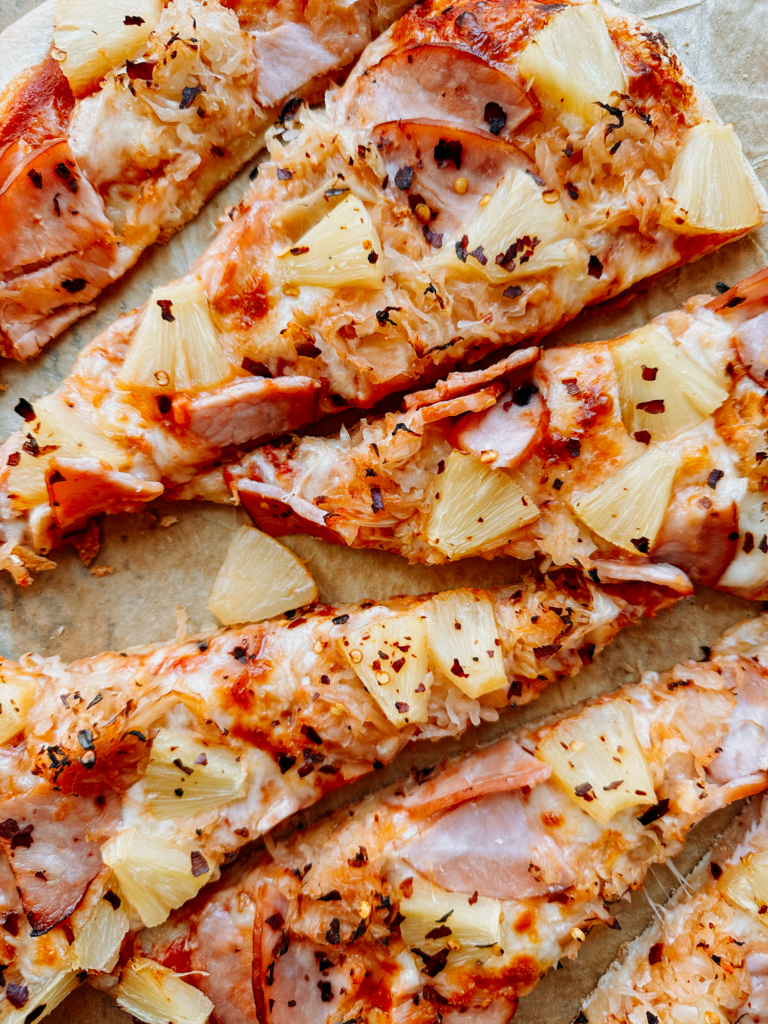
Explore this unique twist on a classic favorite: Canadian Bacon, Pineapple, and Sauerkraut Pizza. Bringing together a balance of tangy, sweet, and savory ingredients, this pizza offers big flavors in every bite. Perfect for casual get-togethers or cozy homemade pizza nights -- this is my all-time favorite pizza topping combination!
Jump to:
- Ingredients needed to make Canadian Bacon, Pineapple, and Sauerkraut Pizza
- Why It Works: Exploring the Flavors
- What is the best pizza crust to use for Canadian Bacon, Pineapple, and Sauerkraut Pizza?
- What temperature is best to bake pizza at?
- Shaping Pizza Dough: Hand-Stretching vs. Rolling
- Serving and Pairing Suggestions for Canadian Bacon, Pineapple, and Sauerkraut Pizza
- The Best Methods for Reheating Pizza Leftovers
- Essential Tools for Making Canadian Bacon, Pineapple, and Sauerkraut Pizza
- Craving More Pizza Night Inspiration?
- Canadian Bacon, Pineapple, and Sauerkraut Pizza

Ingredients needed to make Canadian Bacon, Pineapple, and Sauerkraut Pizza
- Pizza Dough -- Like my Easy Same Day Pizza Dough!
- Canadian Bacon
- Pineapple
- Sauerkraut
- Mozzarella Cheese
- Parmesan Cheese
- Tomato Sauce
- Olive Oil
- Garlic Powder (may substitute for garlic-infused olive oil for the portion above)
- Red Pepper Flakes
- Kosher Salt
Why It Works: Exploring the Flavors
Pineapple on pizza often sparks debate among pizza enthusiasts: some are firmly against it, while others embrace its unique sweetness. Count me among those who enjoy the delightful contrast it brings to a slice.
Taking things one step further, the addition of sauerkraut atop a pizza might raise a few more eyebrows. However, this unconventional pairing of sweet pineapple and tangy sauerkraut is precisely what makes this Canadian Bacon, Pineapple, and Sauerkraut Pizza so delicious.
When pineapple and sauerkraut are placed on the very top of the pizza (rather than under a layer of cheese), they have the opportunity to caramelize and sweeten more deeply, offering a balanced blend of sweet and tangy flavors that complement the umami-rich Canadian bacon perfectly.
In essence, this Canadian Bacon, Pineapple, and Sauerkraut Pizza isn't just about breaking the rules—it's about rewriting them entirely. Give this unique pizza combination a try and discover the perfect balance of sweet, tangy, and savory!

What is the best pizza crust to use for Canadian Bacon, Pineapple, and Sauerkraut Pizza?
Choosing the right pizza crust is essential for crafting the perfect Canadian Bacon, Pineapple, and Sauerkraut Pizza. The crust not only provides a sturdy base for the toppings but also contributes to the overall flavor of this unique pizza recipe.
For optimal results, opt for a versatile crust recipe like this Easy Same Day Pizza Dough, which strikes the ideal balance between chewiness and crispiness. This easy dough recipe is perfect for both hand-stretched pizza crust fans and rolled thin-crust pizza fans.
Alternatively, you can use store-bought pizza dough for convenience. Regardless of your choice, allow the crust to rest and rise adequately before assembling the pizza. This ensures a beautifully baked crust that complements the bold flavors of the toppings.
What temperature is best to bake pizza at?
The temperature at which you bake your pizza is crucial to achieving the best results. To ensure a nicely caramelized topping and perfectly golden crust, it's important to bake your pizza at the right temperature.
While many professional pizzerias use ovens heated to 800 degrees F or higher, most home ovens reach temperatures between 500-550 degrees Fahrenheit (260-288 degrees Celsius). For this recipe, we recommend baking at 500 degrees Fahrenheit (260 degrees Celsius) for optimal results.
If your oven only reaches 450 degrees Fahrenheit (232 degrees Celsius), that will still work well, though you may need to adjust the baking time accordingly, especially if your pizza is heavily topped. By baking your pizza at the appropriate temperature, you'll ensure even cooking and develop a delicious flavor.

Shaping Pizza Dough: Hand-Stretching vs. Rolling
Determining how to shape your pizza dough can significantly impact the final outcome of your pizza. Whether you prefer a classic pie shape with a thicker crust around the edges or an even thickness throughout, your shaping method can make all the difference.
Hand-Stretching Your Dough:
- Begin by rubbing a small amount of olive oil into your hands. This helps prevent the dough from sticking and allows for easier shaping.
- Press the dough down with the palm of your hand to form a disk shape. Then, use your fingertips to gently press down on the dough, further flattening it.
- To extend the dough further, place one palm on one side of the dough and gently lift the opposite side, using your oiled fingertips to slowly stretch the dough outward. Rotate slightly and repeat until the dough reaches your desired size and thickness.
- If the dough starts to snap back or tear, allow it to rest for a minute or two before continuing.
- Transfer the stretched dough to a baking sheet lined with parchment paper.
Rolling Dough with a Rolling Pin:
- Place the dough between two sheets of parchment paper to prevent sticking, or lightly dust the dough and your rolling pin with flour.
- Roll the dough until it reaches your preferred size and shape. If using parchment paper, peel off the top layer once rolled.
- If the dough begins to snap back or tear, allow it to rest briefly before proceeding.
- Transfer the shaped dough (along with the bottom sheet of parchment paper) to a baking sheet.

Serving and Pairing Suggestions for Canadian Bacon, Pineapple, and Sauerkraut Pizza
Complete your pizza night with perfectly paired drinks and side dishes to complement the flavors of this delicious dinner recipe.
For wine lovers, crisp white wines like Pinot Grigio or Sauvignon Blanc complement the tanginess of sauerkraut and the sweetness of pineapple. If you prefer beer, light pilsners or pale ales offer a refreshing contrast to the savory Canadian bacon.
As for side dishes, opt for simplicity with a mixed green salad or fresh tomatoes dressed with olive oil, vinegar, herbs, and salt. These options perfectly complement this homemade pizza without overpowering its bold flavors.
And don't forget the finishing touches! Offer extra red pepper flakes and finely grated Parmigiano Reggiano cheese for sprinkling, along with a side of ranch dressing for dipping aficionados -- Try this Buttermilk Jalapeno Ranch Dressing for an extra kick of heat!
The Best Methods for Reheating Pizza Leftovers
While cold pizza can be a nostalgic treat, reheating leftovers to enjoy them warm can revive their flavors and textures. To maintain the crisp crust and gooey cheese without ending up with soggy slices, consider these methods:
Oven Method:
Preheat your oven to 350° Fahrenheit (175° Celcius) and place the pizza slices on a baking sheet. Bake for about 10 minutes or until the pizza reaches your desired level of warmth and crispness.
Stovetop Method:
For a quick and effective stovetop reheating, use a cast-iron pan over medium-low heat. Place the pizza slices in the pan and cook until the crust achieves your desired crispness. If the cheese needs more melting, you can add a few drops of water to the pan (away from the pizza), cover, and allow the steam to melt the cheese further for a minute or two.

Essential Tools for Making Canadian Bacon, Pineapple, and Sauerkraut Pizza
- A baking half-sheet
- Parchment paper
- A cutting board
- A chef's knife
- A kitchen scale (or measuring cups for less precise measurements)
- Measuring spoons
- A rolling pin (only if you prefer an evenly thin pie) otherwise your hands are your best tool
- Cheesecloth or a clean kitchen towel (to strain the sauerkraut)
- A cheese grater
- A small bowl
- A spoon
- A pizza wheel
- Optional: A citrus zester (for finely grated Parmesan)
Are you looking to upgrade your cooking tools or replenish your pantry?
Check out my kitchen tools shop page and pantry staples shop page to find my must-have kitchen tools, pantry items, and other Whip & Wander favorites.

Craving More Pizza Night Inspiration?
If you enjoyed this Canadian Bacon, Pineapple, and Sauerkraut Pizza, you're in luck! Explore more of my favorite pizza recipes, perfect for your regular pizza night:
- Pepperoni and Pineapple Pizza with Hot Honey
- Oktoberfest Pizza
- Bacon Cheeseburger Pizza
- Taco Pizza
- Peach, Corn, and Jalapeno Pizza with Honey
- Sausage, Fennel, and Calabrian Chili Pizza
- White Clam Pizza
- Eggs Benedict Pizza
Canadian Bacon, Pineapple, and Sauerkraut Pizza
- Prep Time: 10 minutes
- Cook Time: 16 minutes
- Total Time: 26 minutes
- Yield: 1 large pizza 1x
- Category: Mains, Pizza
- Method: Oven
- Cuisine: American
Description
Explore this unique twist on a classic favorite: Canadian Bacon, Pineapple, and Sauerkraut Pizza. Bringing together a balance of tangy, sweet, and savory ingredients, this pizza offers big flavors in every bite. Perfect for casual get-togethers or cozy homemade pizza nights -- this is my all-time favorite pizza topping combination!
Ingredients
- ½ recipe Easy Same-Day Pizza Dough
- 1 tbsp extra-virgin olive oil
- 8 oz tomato sauce
- ¼ tsp garlic powder
- ¼ tsp Kosher salt
- 1 ½ cup (6 oz) mozzarella cheese, shredded
- ¼ cup (0.7 oz) Parmigiano Reggiano cheese, shredded
- 4 oz uncured Canadian bacon
- 1 (8 oz) can pineapple chunks, drained
- ⅔ cup sauerkraut
- Optional: red pepper flakes, to top
- Optional: ranch dressing, to dip
Instructions
- Preheat your oven to 500 degrees F / 260 degrees C and set a bakers half sheet to the side.
- Shape your dough. If you prefer a classic pie shape with a thicker crust compared to the center of your dough, I suggest hand-stretching your dough. If you prefer your pizza to be an even thickness, I suggest rolling your dough out with a rolling pin.
- If you are hand-stretching your dough:
- I like to rub a small amount of olive oil into my hands first; this allows me to shape the dough more easily without it ripping accidentally from friction.
- Press the dough down with the palm of your hand into a disk shape, then use your fingertips to gently press down on the dough disk, further flattening it.
- To further extend the dough, I prefer to press one palm on top of one side of the dough and with the other hand lift the alternative side of the dough and gently work the dough outward, pulling very gently with the tips of my oiled fingers (like a very discrete “come hither” motion) to slowly stretch the dough out. Rotate slightly and repeat until the dough is shaped and stretched to your liking. If you find that the dough starts to snap back or is beginning to tear, allow the dough to relax for a minute or two before proceeding again. Transfer your stretched dough to a sheet of parchment paper.
- If you are using a rolling pin:
- I prefer to place my dough between two sheets of parchment paper to avoid the dough sticking to my rolling pin, but if you prefer you can also sprinkle a bit of flour over the dough ball as well as wiping some over your rolling pin by hand to prevent sticking instead. Once the dough has been rolled to your preferred size and shape, peel the top layer of parchment paper off (if using). The bottom layer that the dough is resting on can be utilized for your baking sheet. If you find that the dough starts to snap back or is beginning to tear, allow the dough to relax for a minute or two before proceeding again.
- If you are hand-stretching your dough:
- Transfer your shaped dough to the reserved baking sheet.
- Brush olive oil onto the pizza dough lightly and evenly. This can be done with a pastry brush or the back of a spoon
- In a small bowl combine tomato sauce, salt, and garlic powder. Pour over the top of the pizza dough and using the back of a spoon spread the sauce out evenly over the dough.
- Top the pizza with mozzarella, then parmesan. Layer the Canadian bacon on top of the cheese, dispersing evenly across the pizza. Then repeat with the pineapple.
- Gather the sauerkraut into a cheesecloth or a clean kitchen towel securely. Over the sink, squeeze out as much of the juice from the sauerkraut as possible. The less juice, the less potential for a soggy pizza.
- Bake for 16-22 minutes or until the crust has reached your preferred level of crispness and the cheese is fully melted and starting to blister: The edges of the sauerkraut should be turning brown. I find that pizzas that have a thinner topping layer take less time to bake and heavier-topped pizzas generally take a bit longer to bake so watch your pizza closely after the 16-minute mark and adjust as desired.
Notes
Nutritional information on Whip & Wander is provided as a courtesy and is approximate only. We cannot guarantee the accuracy of the nutritional information given for any recipe on this site.
3/1/24 This recipe was updated and may no longer fit specified dietary preferences from previous versions of this post. Previous version 10/16/20.
Nutrition
- Serving Size: ¼th of the pizza
- Calories: 573
- Sugar: 12 g
- Sodium: 1496 mg
- Fat: 22 g
- Saturated Fat: 9 g
- Carbohydrates: 64 g
- Fiber: 4 g
- Protein: 31 g
- Cholesterol: 46 mg
Leave a Reply