

Talk to moms regularly because they have the best ideas
Recently, the fella was on the phone catching up with his mom in the midwest when she mentioned she recently bought some boneless beef ribs and wasn't sure what she was going to do with them. After looping me in on the convo I said "I'd throw them in the pressure cooker first to cook and tenderize, then slather them in BBQ sauce and finish them under the broiler or on the grill to crisp up the edges." quickly followed by "Gosh, now I want boneless beef ribs too!" Cut to me purchasing 3lbs of boneless beef ribs that very afternoon for dinner the following night because I had rib envy (that's a thing, right?).
How to use salt to create tender, flavorful meat
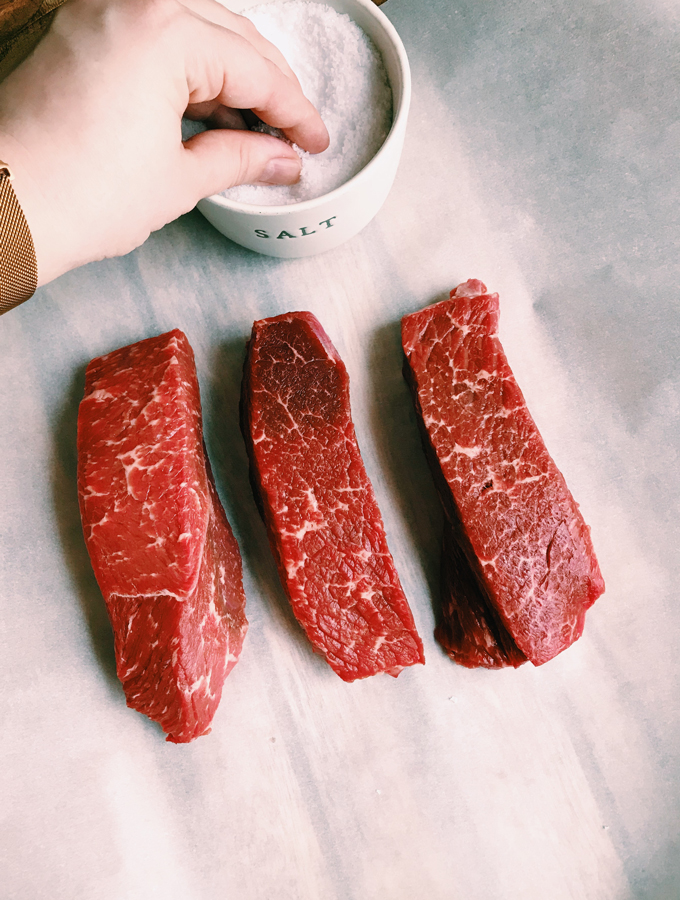
In addition to fat, much of the flavor of a well-prepared piece of red meat is often dependent on how it's salted. Cooks often disagree as to whether you should salt immediately before cooking meat or well in advance, but in my experience, I've had the best results salting (unground) red meat a minimum of 1-hour before cooking and up to a night before if you're planning ahead. This allows the meat to have ample time to fully absorb the salt, leading to a more flavorful and tender piece of meat.
Atleast one-hour before (ideally the night before) pull out the boneless ribs and salt them liberally on each side. When cooking red meat in my pressure cooker, I use roughly ¾ teaspoon of sea salt per pound of meat.
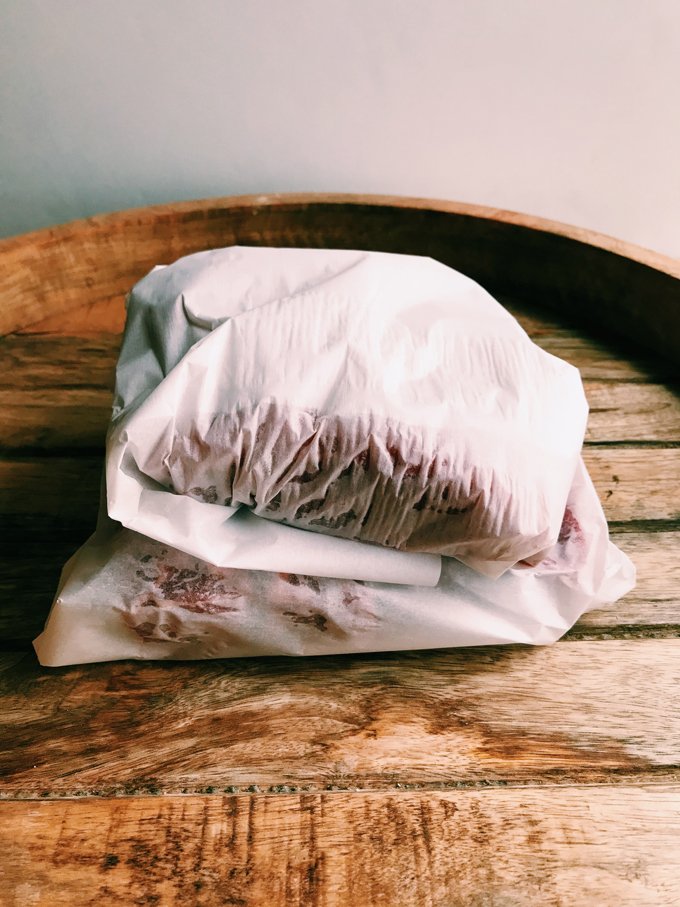
If salting more than an hour in advance, I like to wrap the ribs in parchment paper (3-4 per packet), stack them on a plate, and return them to the fridge. Pull the ribs out of the fridge one-hour before you intend to use them. If salting one-hour prior to cooking, leave the meat to rest on the counter at standard room temperature.
I prefer to use this coarse sea salt from Jacobsen, but I know many cooks who also swear by a Kosher salt, like Diamond. I always like to steer clear of traditional table salt because it generally contains additional additives to prevent caking and I just don't think it tastes as good. *If you do, ultimately, choose to use table salt (for some unknown reason), you'll want to decrease the amount of salt used per pound by nearly half as the salt crystals are generally much smaller than their Kosher or sea salt counterparts, and thus each measured amount has much stronger salting power.


Broiling vs. Grilling
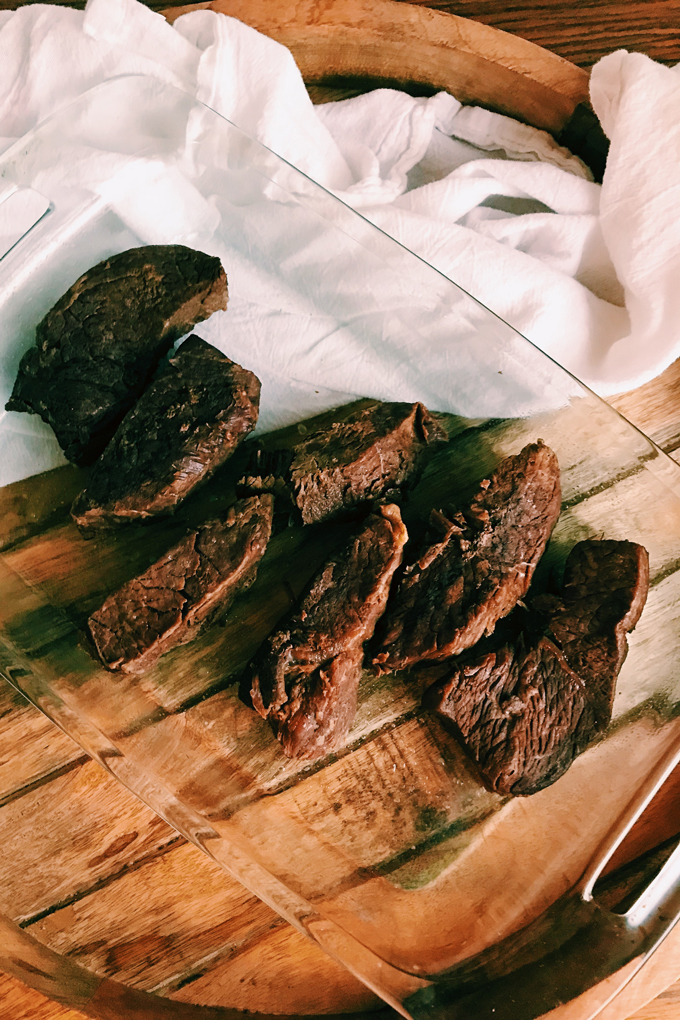
Though the meat cooks fully in the pressure cooker, I love to finish this dish with a quick turn under the broiler or on top of the grill to produce just a little bit of the char and caramelization to the outside of the ribs. I personally prefer to stick to broiling in the cooler months and grilling in the warmer months, but either method works nicely for these ribs:
Broiling: Place the ribs in a high-heat oven-safe casserole dish or sheet pan. Broil on high for 4-8 minutes total or until ribs have reached your desired level of char. Broil temperate can vary between ovens, though most range between 500-550 degrees F / 260 – 290 C on high. Therefore, I like to check on them after about 4 minutes to gauge their progress -- and every 2 minutes thereafter until I'm happy with the way they look.
Grilling: Bring your grill up to high heat (450-500 degrees F / 232-260 degrees C). Grill the ribs on one side for 2-4 minutes (depending on your preferred char-level) with the grill lid open, then flip and cook the opposite side for an additional 2-4 minutes.
*If you don't mind losing those lovely crisp edges, this recipe is perfectly delicious if you want to skip the broiling or grilling step after pressure-cooking, slather these bad boys in some BBQ sauce and call it done.
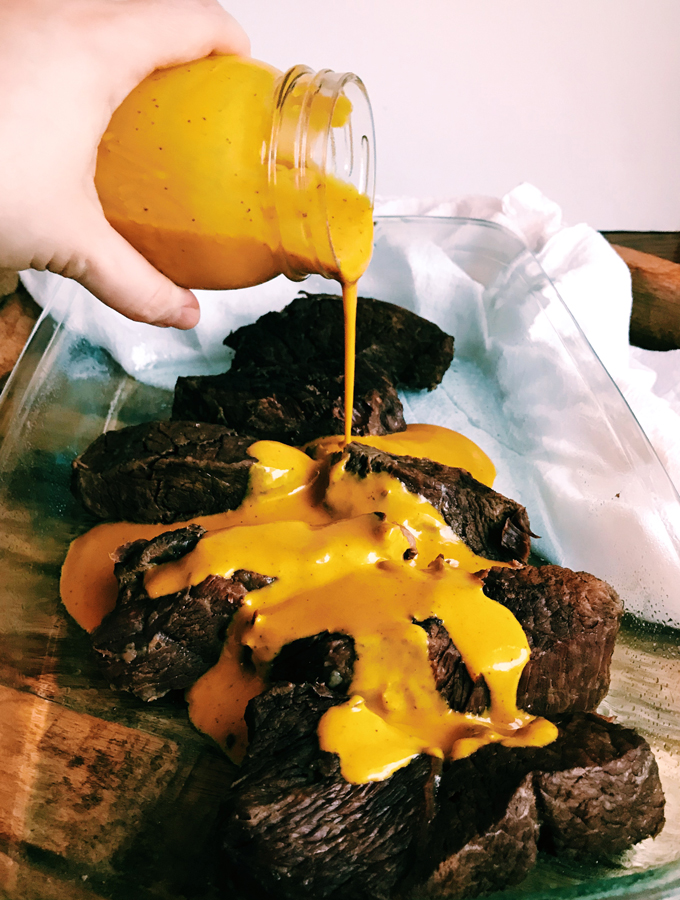
The magic is in the sauce
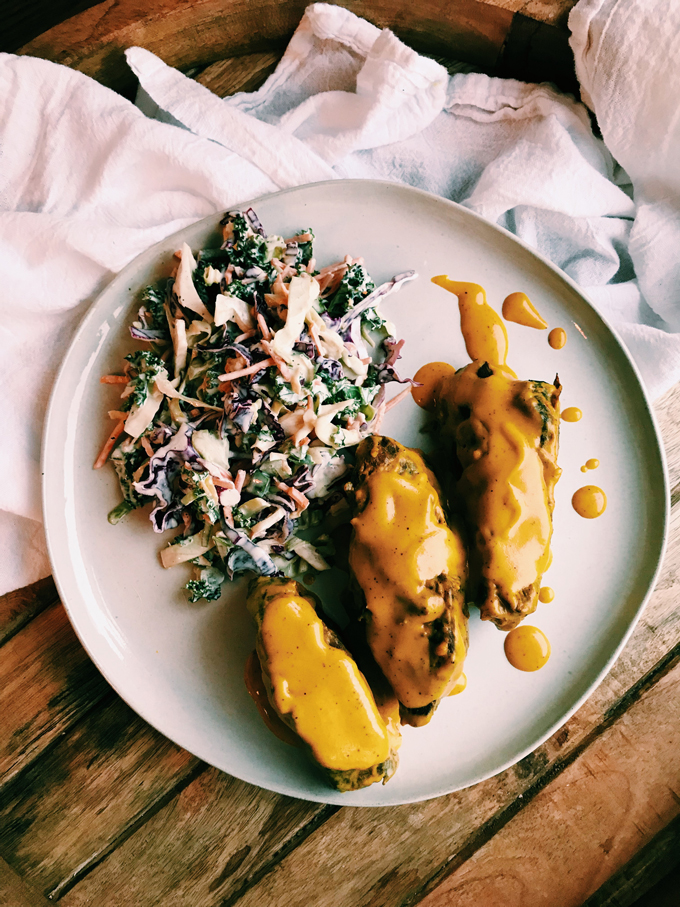
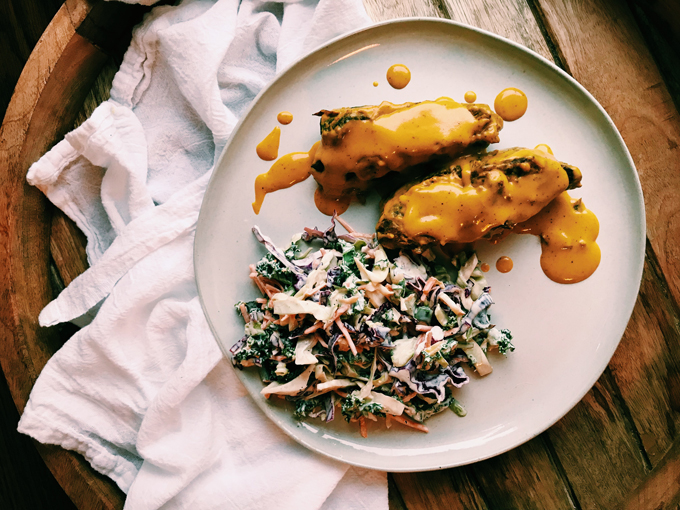
Don't get me wrong, salting and cooking the meat properly is the most important aspect of this recipe, but the sauce is what truly takes these Pressure Cooker Boneless Beef Ribs over the top! Though you can easily substitute your favorite bbq sauce in this recipe, my favorite option to use is this Carolina Gold Mustard BBQ Sauce. This mustard-based sauce comes together in less than 5-minutes and is the perfect balance of zingy vinegar + pinch of sweet + just the right amount of spice to make these ribs really sing!
If mustard-based bbq sauce isn't really your thing, check out my Spicy Red BBQ Sauce or my Chipotle Peach BBQ Sauce.
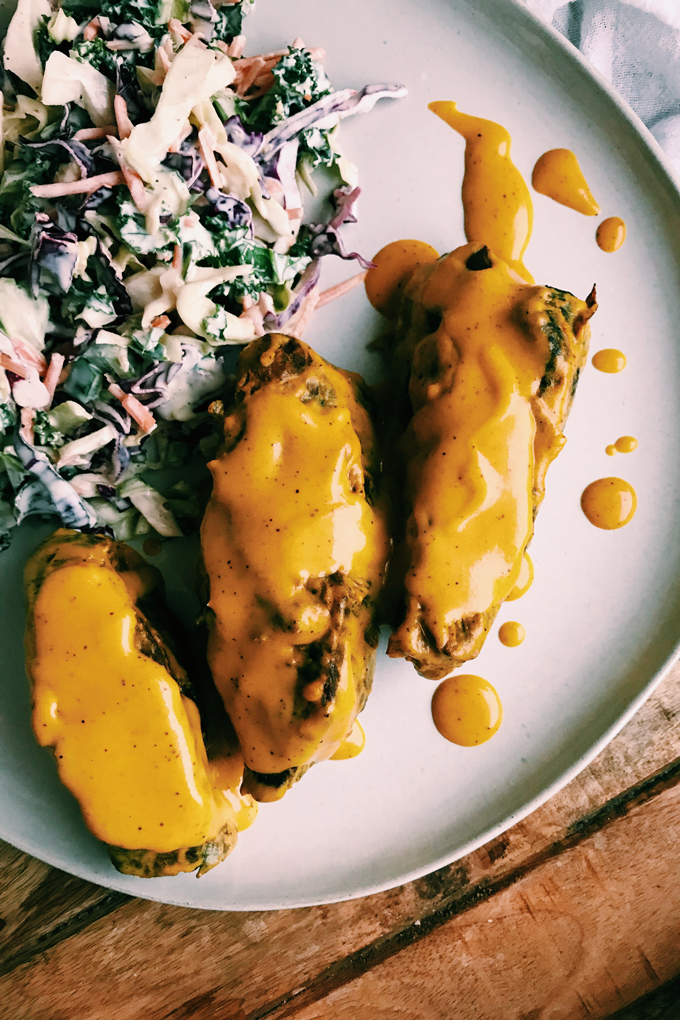
How to serve these Pressure Cooker Boneless Beef Ribs
My favorite side dish for these ribs is a simple coleslaw, like this 5-minute Spicy Cabbage Slaw recipe. A good slaw pairs well whether you're aiming for a low-carb dish or if you'd like to carb-it-up for the night and layer everything on a sandwich roll.
What tools do I need to make this recipe?
- An electric pressure cooker (preferably with a rack insert)
- Measuring cups and measuring spoons
- A basting brush
- If broiling: A high-heat oven-safe casserole dish or sheet pan
- If grilling: Grilling tongs
Are you looking to upgrade to your cooking tools or replenish your pantry? Check out my kitchen tools shop page and pantry staples shop page to find my must-have kitchen tools, pantry items, and other Whip & Wander favorites.
Which pressure cooker do I use?
This recipe is titled “pressure cooker” rather than “Instant Pot” intentionally because I want it to be flexible for the other models outside of the Instant Pot brand. I personally use an Instant Pot Ultra 6qt, but these Boneless Beef Ribs can easily be made in other electric pressure cookers as well. The reason I mention this is because each brand varies, and with that cooking times may vary slightly. These Pressure Cooker Boneless Beef Ribs cook in my Instant Pot on high for 45 minutes and have produced fall-apart tender results.
A note for special diets
These Pressure Cooker Boneless Beef Ribs are gluten-free, grain-free, low-carb, and SIBO friendly. In order to make this dish Paleo and Keto friendly, there are some small swaps you can make to the Carolina Gold Mustard BBQ Sauce below. These are additionally outlined in that post as well.
For those following a strict Paleo diet, a simple swap for Worcestershire sauce is coconut aminos. For those following a strict Keto diet who do not want to consume the (tiny amount of) honey contained in this BBQ sauce, you may substitute the honey for 1 tablespoon monkfruit or equivalent sweetener. Please note that these swaps may slightly change the flavor of the bbq sauce.
Estimated nutrition facts for this recipe when swapping honey for monkfruit in the BBQ sauce (per ½ lb serving of ribs): cal: 551, fat: 39g, chol: 152mg, sod: 1010mg, carb 0g, fib: 0g, sug: 0g, prot: 46g
Print
Pressure Cooker Boneless Beef Ribs
- Prep Time: 5 minutes
- Cook Time: 51 minutes
- Total Time: 1 hours 56 minutes
- Yield: 3 lbs 1x
- Category: Mains
- Method: Pressure Cooker
- Cuisine: American
- Diet: Gluten Free
Description
Pressure Cooker Boneless Beef Ribs with Carolina Gold Mustard BBQ are a deliciously easy way to enjoy BBQ all year long.
Ingredients
- 3 lbs boneless beef ribs (sometimes referred to as "Country beef ribs")
- 2 ¼ tsp sea salt
- 1 ½ cups beef broth
- 1 cup Carolina Gold Mustard BBQ Sauce (plus more to top at the end if you like things saucy)
Instructions
- Atleast one-hour before (ideally the night before) pull out the boneless ribs and salt them liberally on each side.
- If salting more than an hour in advance, I like to wrap the ribs in parchment paper (3-4 per packet), stack them on a plate, and return them to the fridge. Pull the ribs out of the fridge one-hour before you intend to use them. If salting one-hour prior to cooking, leave the meat to rest on the counter at standard room temperature.
- Fit your electric pressure cooker with the rack insert. Add the beef broth to the bottom of the pot then lay the beef ribs on top of the rack, packing them next to each other in one layer, if possible, rather than piling them on top of each other.
- Secure the lid (and valve if your machine doesn't have an auto valve) and set the machine to high pressure for 45 minutes.
- When the pressure cooker has nearly finished it's cooking cycle, preheat your oven by setting it to the broil setting on high.
- When the cooking cycle has finished, quick release the pressure. Transfer the ribs to an oven-safe dish, leaving the broth behind in the pressure cooker.
- Using a basting brush, baste the ribs in BBQ sauce, taking care to coat them evenly.
- Though the meat cooks fully in the pressure cooker, I love to finish this dish with a quick turn under the broiler - OR - on top of the grill to produce just a little bit of the char and caramelization to the outside of the ribs.
- If broiling: Place the ribs in a high-heat oven-safe casserole dish or sheet pan. Broil on high for 4-8 minutes total or until ribs have reached your desired level of char. Broil temperate can vary between ovens, though most range between 500-550 degrees F / 260 – 290 C on high. Therefore, I like to check on them after about 4 minutes to gauge their progress -- and every 2 minutes thereafter until I'm happy with the way they look.
- If grilling: Bring your grill up to high heat (450-500 degrees F / 232-260 degrees C). Grill the ribs on one side for 2-4 minutes (depending on your preferred char level) with the grill lid open, then flip ribs and cook the opposite side for an additional 2-4 minutes.
- Once the ribs have reached your desired level of crisp edges and have been removed from heat, top them with additional bbq sauce, if desired.
Notes
Nutritional information on Whip & Wander is provided as a courtesy and is approximate only. We cannot guarantee the accuracy of the nutritional information given for any recipe on this site.
Nutrition
- Serving Size: ½ lb
- Calories: 565
- Sugar: 4 g
- Sodium: 2180 mg
- Fat: 39 g
- Saturated Fat: 16 g
- Carbohydrates: 4 g
- Protein: 46 g
- Cholesterol: 152 mg
Katherine | Love In My Oven says
I'm so excited to try this one!! We love beef ribs, and using the pressure cooker makes it a nice and easy option for dinner. I would definitely do the broiler trick too!
Amanda Mason says
These ribs look absolutely mouth watering! That sauce...yum! Love that it's mustard based. That's my favorite. I agree with you on the salt aspect. Im absolutely making this soon! Printing out the recipe now!
Jeannette (Jay Joy) says
I LOVE THESE TIPS!!!!! I will try the pressure cooker first to cook and tenderize, then finish them under the broiler to crisp up the edges. Sometime sits so hard to get them just right. I think this is the key.
Marie says
I don't have a pressure cooker at the moment, but if I did, I'd be making these soon. I will be making some ribs soon though, but in the oven and grill. I'll try salting them ahead of time as you suggested. The bbq sauce sounds wonderful too!
Jere Cassidy says
I am horrible at cooking meats so this was a great read. I have tried salting the meat before cooking and I do prefer that. These ribs look delicious.
Amy says
My mouth is watering over here! Your photography is amazing!
Whip & Wander says
Thanks, Amy!
Tammy says
I bet salting them beforehand really makes then super tender and juicy! These look awesome...I will have to try this next time and the sauce looks terrific too! 😀 I'll have to keep an eye for it in the store next time.
Whip & Wander says
There's actually a recipe attached. Just click anywhere the name of the sauce is hyperlinked. It takes less than 5 minutes to make and is so delicious!
Carrie | Clean Eating Kitchen says
I love pressure cooker recipes and these beef look delicious! That sauce sounds delicious, look forward to trying this!
Amanda says
I just love this recipe! It makes ribs so easy during the week, and that mustard sauce is the perfect touch. Putting them under the broiler is a great idea. Thanks for sharing!
Hillary Knudsen says
These look delicious! Carolina gold is the BEST bbq sauce 🙂
Whip & Wander says
I totally agree! My favorite!
Stine Mari says
Yes, there is definitely a thing called rib envy, I'm suffering from it right now. I think this meat looks so tender and perfect, and I love that you added more information about the salting! That sauce looks like it complements the beef perfectly too.
Whip & Wander says
It happens to the best of us! I'm glad you appreciate the extra info about salting - it's such an important step!
Sam Harbison says
Oh man, I have a serious craving now! These look incredible. Plus I was just saying yesterday how I need to use my pressure cooker for more than just making rice. Thanks for the recipe!
Whip & Wander says
It was meant to be! I'm confident the more you use the pressure cooker, the more you'll see how easy it can make other dishes than rice. I rely on my machine for so much these days!
Megan Joy says
This looks delicious! The spicy cabbage slaw looks so good too. I've never cooked ribs at home before but I might try now!
Erin @ Platings and Pairings says
The sauce on those ribs just looks SO good! I can only bet that they are so tender in the pressure cooker too!
Becca says
Yes please!! I need to use my pressure cooker more often and this looks so good! And you’re definitely right, the magic is in the sauce. I love me a good sauce.
Whip & Wander says
It's a super versatile sauce. We love it on chicken and pork also!
Kelly Anthony says
These ribs look like they are cooked perfectly. How great that I can put them in the pressure cooker and walk away while my dinner is cooking. So good!
Elaine Benoit says
That looks sooooo delicious! And I think the broiling is definitely necessary! And the mustard sauce? Holy moly, what a wonderful meal!
Whip & Wander says
Agreed! They're good right out of the pressure cooker, but the broiling takes them over the top!
Veena Azmanov says
This is surely mouth melting and delicious. Love the flavors to it. Cant wait to try some.
Gloria says
Beef ribs are so delicious. These look so tender. I do love my pressure cooker. What a way to make them melt in your mouth. Love the fact they are boneless too...and that sauce looks amazing.
Colleen says
These ribs are cooked to perfection, and I agree with your extra step under the broiler, for the char. A perfect meal with the coleslaw, and that sauce looks so good!